| Home | Newsletter | Locations | Diary |
|
Indexes |
|
|
|
|
Article Railway Photography
Railway photography is very varied, you have steam trains, both passenger and goods, and diesel historic and modern and electric trains. In addition you have narrow track railways, and tramways. Railways run through towns and cities, countryside, along coastlines and wind around some mountains. They cross roads, rivers and canals on a range of different bridges, and viaducts, and go through tunnels, and cuttings and on embankments. They run through woodland, moorland, and national parks, you have single track, and some with many tracks. There are sidings full of rolling stock, and a range of railway equipment and architecture as well as some special and unusual features to discover. Some photographers specialise in one type of railway photography, and the majority of these are the steam railway enthusiasts. Many of these photographers are not keen on diesel engines, often referring to them as boxes on wheels or similar. However there are also those who find diesel engines of major interest and those who prefer trams or modern trains. Accessibility Most heritage railways, are run by or staffed by volunteer enthusiasts, and are delighted to see you showing an interest in their railway. I have never come across anyone who has been restricted in any way from taking photographs on the platforms, trains or trams that are run by heritage groups.
This is not always the case with modern day railways, where photography on platforms is often restricted and photography nearby may result in questions being asked as to what you are doing and why. The modern day railway has its own police force (the British Transport Police) and like all police forces tend to see danger or problems where none exists, so while a heritage railway sees a fellow enthusiast, and will even often help you to get a better photo, railway and other police may see a potential terrorist and want to restrict your activities, question or search you, and sees no reason why you should be left alone to carry on your legal activity. The modern railways also see filming and photography on stations as a source or revenue. If you want to photograph modern railways, then its best to do this as the trains travel from place to place, but away from stations and preferably away from locations where passing police cars and the like may spot you. There are no legal restrictions on photographing trains, or stations from a public right of way, but on railway property when not on public rights of way, there may be railway bylaws that restrict you. You are not allowed to go onto the modern railway other than at authorised points, unless there are special arrangements when a special train or show is being put on. You normally have no problem photographing from a train. We have produced a listing of all the
heritage railways, tramways and museums that have a direct relationship with
this, we have not included modern railways. This listing is organised both
alphabetically
Preparation for railway photography Before you visit a preservation railway or
tramway, you need to check its opening times and what is running on
particular dates, just because its a steam preservation railway does not mean
it always runs steam engines, many also have heritage diesels and will use
these some days. Most railways have published timetables on their websites,
and from this you should be able to see both the number of trains running and
the type on the days when you propose to visit. Steam trains are photographically
more interesting when the front of the engine is pointing forward, rather
than on return trips where the tender or rear of the train is seen. Most
railways have some engines pointing in each direction, and where two trains
pass you can see you could get a variety of situations. Its often difficult
to work out which way engines are pointing, but some have an enthusiasts
section on their website that tells you which engines are scheduled to run
on set dates and often which way they are pointing. Take for example the
Gloucestershire and Warwickshire Railway near to us, this has within its
enthusiasts section a page labelled Loco roster
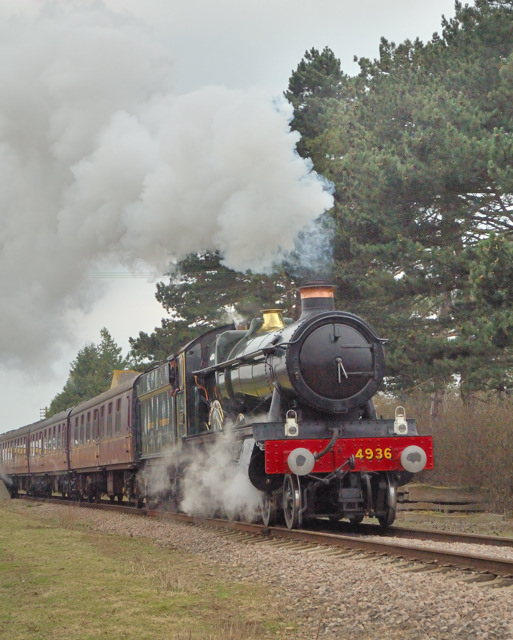
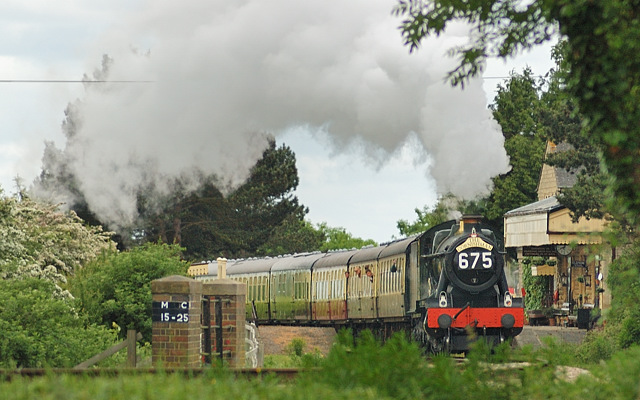
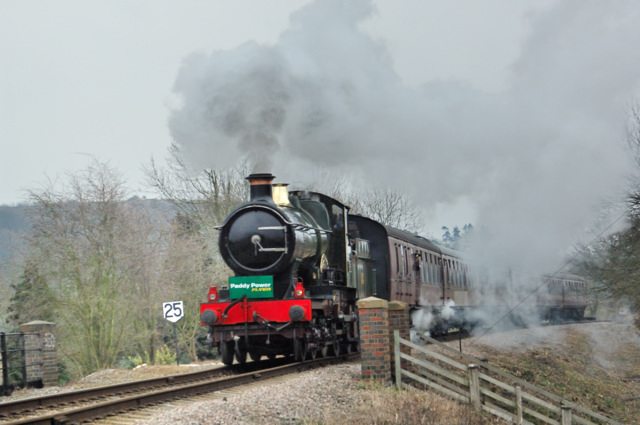
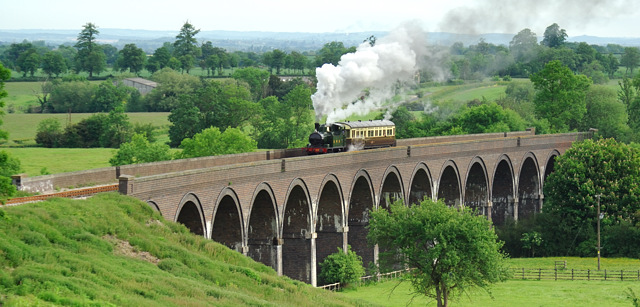
You will find a lot of information on many of the websites, but its not always easy to find, often you need to look through event pages including past events to find links to the information you want. These websites are often run by volunteers, and often they are more interested in the running of the railway than the website. In some cases you will find an official website, and unofficial ones by other members or enthusiasts, that often give more 'working' information, where the main site may be static, aimed at tourists. You can often find these from the links section or mentioned in the enthusiasts section of the official website. Having worked out what is running and when you are going to visit, the next question is where to go. The main terminus or station is one obvious answer, but you can also often work out other locations along the line that would offer good opportunities to you. You can usually see both details of the route on their website and follow the route with various mapping systems. In some cases aerial photographs or mapping systems can help, but these are not always up to date images. From photographs you can find of the railway, either from links from the railways website, a search engine or by going to an enthusiasts websites or general image storage websites, you can usually get a good idea of the terrain and the sort of shots others have gone for. However you can't always get access to the locations where these were taken from. Maps will show you public paths, bridges and the way the track bends, but cannot show you the visibility or problems such as hedges or weed growth. Using a sun compass you can work out where the sun will be, both in direction and approximate height. As you will see, some information is easily available, some you can deduce, but other information you cannot and therefore you want a plan with several locations, in priority order allowing you to visit them in turn, using those that are suitable and moving on when not. Ideally we would all do a recce visit first, visit possible locations, work out if these would be good and for which shots, and using this and a timetable be able to work out where to be and when. Very few railways have turntables so generally if you see a train one day pointing in a particular direction its unlikely to change. So even if you have not done a recce before, what you see at the start of the day builds to the information you have for use later. Setting up for the shot You have arrived, like the location and setting, and know approximately when the train is likely to come along, now you need to decide on the way you are going to photograph the train. Where you are and the view you have may place some limitations as may obstacles. If you use a longer lens and take the train while its still further away you will compact the shot, making the shot busy, and including a lot of the train, if you take it when its very close using a wide angle lens, you will probably get just the engine but the size and power of it may be able to be shown. You have a range of in-between shots that give you other effects. You can decide to crop in closely on the train or select a view far wider putting it into a landscape. Similarly you can concentrate on the train or include a lot of sky space allowing you perhaps to get the steam and smoke billowing up. Most of what comes out of the top of a train is steam, and if the fireman and engine driver are experts it will be fairly white, with little soot and mess. The steam comes from the cylinders that drives the rods that make the wheels go round, up through the front of the engine, and expands coming out of the top, but also acting as a draw on the fire. During the course of a busy day, a typical engine burns between 1 and 1.5 tonnes of coal, but uses 6,000 gallons of water, the majority of which comes out the top, condensing to produce the cloud like material that comes from a stream engine. You are more likely to see it when the engine is pulling away, accelerating or on an upward slope and less when slowing, or coasting down a slope. The engine crew may also on some lines have smoke capsules that they can throw onto the fire producing a lot more smoke when required, and this in combination with opening up a bit can produce more striking smoke affects. You will find some lines use these, and more commonly on galas, press days and photo events. We need to consider the depth of field, if
using a longer lens, with a wide angle lens its unlikely to be a problem.
Although often we don't have enough depth of field to put the whole of the
train in focus, often we can decide on the part that is important to the
image and use the depth that we have efficiently to achieve this. If you
have been on a
focus and depth of
field Masterclass
In sorting out the depth of field you will have already decided what aperture you want to use, next we need to consider speed and ISO. If we are photographing the train head on or very near, so we don't need exceptional speed, but if we are taking it when its rushing past at speed, with a near side on show, we are going to need to either pan with the train, so the train is sharp and background is allowed to blur or to use a higher shutter speed. In many cases you will have a good idea of the speed and aperture you would prefer and be able to select a good compromise adjusting the ISO to make this happen. You don't want excessive ISO, but often its better to run with higher ISO than in many other situations to get the combination you want. Sorting out the exposure is best done before the train arrives, and as you will appreciate with our digital cameras we can take a test shot or two, check it is as we want it, deleting these, and being ready. Its usually best, if the train is likely to be a major part of the image, having got this right, to use the exposure lock facility on the camera as the train approaches. The train usually being dark in colour would be likely to upset the preparation and metering that we had done if we did not do this. On Nikon cameras you have a button marked 'AE-L AF-L' to the left of the main command dial, (top right corner of back of camera). This is a programmable button, you can if you wish set this on the menu to just lock the exposure, by default it locks both exposure and focus. Other makes of camera will have similar arrangements. If you are locking both focus and exposure then focus on the point where the train will be when you are going to press the button. Its always better to underexpose than over expose. In editing we can get information from shadows, and brighten images, while once highlights are blown its often difficult to get much of them back. However you don't want to underexpose too much with trains or when you attempt to lighten the engine, image noise will become visible. There is a temptation to try to get a lot of shots in the few seconds available, but this can be counter productive. It would usually be better to get a single 'best' shot. You will find some using the motor drive, and bracketing, in an attempt to sort something out later from the mess, but the success rate with this approach is low. We can plan, we can work out what to take but there is still an element of luck, some shots will come out very well others you will be less pleased with, often because there is insufficient steam, the wind blows it away, the composition does not work as well as you expected or there is something in the foreground that you did not notice, that is now annoying. In a day you should have plenty of time to move from one location to another and get a variety of shots, perhaps chosen to line up with the direction trains are pointing, but also perhaps the position of the sun. As you don't need to ride the train to get photographs, there is no cost. On another day you could choose to ride the trains with a day rover, getting on and off. You will find you can get photos of trains arriving at stations and then get on taking a ride, and if you know the layout often you can get off and move to a position where you can photograph the train in the station and often departing as well. If you work the timetable you can also often be at cross over points to get two trains at the same time. Long or short lines Some railways have a lot of line, some hardly any at all. Often where there is only a short amount of line there will be more frequent trains so perhaps more photographic opportunities, but not as wide a range of location opportunities. With short lines usually only one train will run at a time, while with longer ones in order to get the number of trains up they will use several trains and cross over at set points, usually in stations. Some running more trains will also have several different carriage sets. Some also run some goods trains and most do on special events. Where lines are being extended, you will often find at weekends the volunteers out doing this and often they will have a support train with them. Its often a diesel but may have an interesting set of wagons, including cranes, line carrying etc. Other lines often have similar trains but used only for maintenance and perhaps therefore more difficult to see operational.
Moving up a gear We at Camera Images can take people out photographing trains, and have a training day defining this. In practice its more often a day added into several when someone has visited us to undertake other training and using the railway photography day as a means of putting it all together, and trying out what they have learnt. In most cases we will get them a lineside pass, and provide them with the necessary orange safety wear, so that we can take them onto the line, and as we know the local line well, we know how to get to both ends of the tunnel, as well as many other places, we also know where we can leapfrog the train, often getting several photos of the same train at different places. This year we are also taking some people out taking live action 3D photos of trains, using a special tripod that holds two Nikon D300 cameras, with matching lenses and graduated filter kits. The cameras are wired together, to take two two images at the exact same time. Other Links
Camera Images
website
Photography Skills
Masterclass for
Depth of Field.
|
||||||
|
||||||
|
|
||||||