Article
Taking a Pinhole Gallery
I have looked before at pinhole photography,
see all the articles in the
Pinhole Photography  section, and this time I set about a slightly different project to find out
what just could be taken on a typical day out to produce a gallery of
photographs using just pinhole techniques, that is without a camera lens at
all, but a blanking plate and small pin hole.
section, and this time I set about a slightly different project to find out
what just could be taken on a typical day out to produce a gallery of
photographs using just pinhole techniques, that is without a camera lens at
all, but a blanking plate and small pin hole.
This article looks at what I did, and why,
with enough detail that you could use it as a guide to have a day out
yourself without a lens.
We put a day aside in our diary and decided
whatever the weather conditions this would be our day for the experiment, it turned
out to be an overcast, but dry day. The place we decided to visit for the
test was a place we had been before, Britain's second largest stone circle
Stanton Drew
 in Somerset. In many
ways England's most impressive stone circle, in my view more
interesting than
Stonehenge
or
Avebury
in
Wiltshire, and still
in its original form, rather than reconstructed like most others. However it's
off the beaten track, not commercialised and has very few visitors, its car
park will hold only 3 or 4 cars and while we were there on this visit there
was just a couple of other people present for a part of the time. You will
find we have a feature guide on the
Stanton Drew Stone Circles,
but before did not have a gallery. On this trip we had two
photographers both with identical Nikon cameras each producing a gallery,
one taking photographs for a gallery with a Nikon lens on the camera, and
the second, me, with no lens, but using a pinhole. The gallery with the lens
was also to use some photos we had taken on previous trips. See the
Stanton Drew Stone Circle - Pinhole
Gallery in Somerset. In many
ways England's most impressive stone circle, in my view more
interesting than
Stonehenge
or
Avebury
in
Wiltshire, and still
in its original form, rather than reconstructed like most others. However it's
off the beaten track, not commercialised and has very few visitors, its car
park will hold only 3 or 4 cars and while we were there on this visit there
was just a couple of other people present for a part of the time. You will
find we have a feature guide on the
Stanton Drew Stone Circles,
but before did not have a gallery. On this trip we had two
photographers both with identical Nikon cameras each producing a gallery,
one taking photographs for a gallery with a Nikon lens on the camera, and
the second, me, with no lens, but using a pinhole. The gallery with the lens
was also to use some photos we had taken on previous trips. See the
Stanton Drew Stone Circle - Pinhole
Gallery
 Stanton Drew Stone Circle Gallery
and to see the images we took.
Stanton Drew Stone Circle Gallery
and to see the images we took.
We chose
Stanton Drew Stone Circle
for this, in part because we wanted to add a conventional gallery for
this location, but also as with slow exposures for the pinhole photos, I did
not have to allow for people moving and stones never do, except in the
movies.
The pinhole I decided to use for this day was
the
pinhole adaptor
 from the Pinhole Factory. When I last wrote a number of articles on
pinhole photography, I had only just managed to get this and had not had a
chance to try it out fully. I decided to use it on its own rather than with
a
tubes set
to get telephoto effects, so these images are the widest that I
could get with this device. I also wanted to see just how easy or hard it
would be to take photos, given that I could not use the viewfinder with a
pinhole in place and didn't want to swap lenses to adapters back and forth on a
locked tripod for every shot.
from the Pinhole Factory. When I last wrote a number of articles on
pinhole photography, I had only just managed to get this and had not had a
chance to try it out fully. I decided to use it on its own rather than with
a
tubes set
to get telephoto effects, so these images are the widest that I
could get with this device. I also wanted to see just how easy or hard it
would be to take photos, given that I could not use the viewfinder with a
pinhole in place and didn't want to swap lenses to adapters back and forth on a
locked tripod for every shot.
The method I used was to put the camera onto a
tripod and use the tripods spirit level to level the camera in all
directions and then just point it in the direction of the subject. Moving
backwards or forwards and just occasionally tilting the camera up or down to
get the images I wanted. I could then see what I had taken and make an
adjustment to the camera position and direction if necessary. Using a
Hoodman Loupe
made looking at the images I had taken far easier. The camera was fired
using a short
cable release.
Colour Balance
left on auto, but images taken
in RAW so I could, if I wanted, change this after.
I set the
ISO
at 640, for no specific reason,
slightly faster than I would have the camera routinely set, but still in the
mid range. Using a high ISO would not have got me off the tripod and in any
event I could not see what I was shooting, the pinhole image in the
viewfinder being too dim.
A few experimental photos allowed me to get
the exposure variation from the
Exposure
on the
exposure meter, and once
this was known I was then able to take all the photos using the cameras
exposure meter,
and an offset exposure variation. In practice
I set the
camera to the pre-setting I had for a manual f9.5 lens, and put an exposure
variation of +5EV, the cameras maximum and then used the meter to go to
one EV overexposed. I could have, in a few seconds, created another
setting for the camera with a far nearer f value and then just used the
variation to get it right, but I was in the middle of a field and keen to get
on and take photos and this produced exactly the same results. With
hindsight I should have made a note before leaving home that the pinhole is
said to be f167, and perhaps have set up a camera setting and worked out
the variation under test conditions, but my more messy way out in the field
got the same results in a minute or two.
As the aperture of the pinhole is fixed, I
was in manual mode and just changed the speed, and speed ranged from a
quarter to an eighth of a second, the most common being a fifth of a
second.
|
So what could we expect to get
Pinhole photographs appear
sharp when viewed near to the size that they are taken, so if you had a
pinhole on a large format camera, for example an old plate camera with a
cut sheet adaptor using film, it would at the plate size appear sharp. With
a small camera sensor and at the size the
image is on the back of the camera unmagnified it appears sharpish, as
we start to enlarge it, we find the image is softer than we are used to
having with a quality lens, and the larger we take it the more
noticeable this becomes. The quality is not much different to that
produced by cheap cameras with plastic lenses. Some may like this and
perhaps we could say its artistic.
A little experimenting since has shown we
could fill a large screen and view this from some feet away as you would
a painting, or for website use perhaps the image size of around 400
pixels wide is about the limit to go to. Very many website photos are
far smaller than this and if we reduced them we would get what would
appear to be a sharper photo.
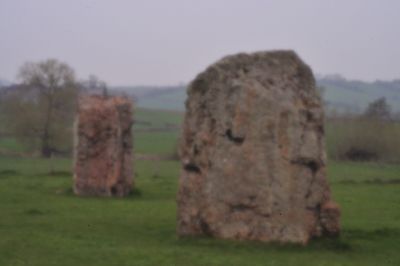
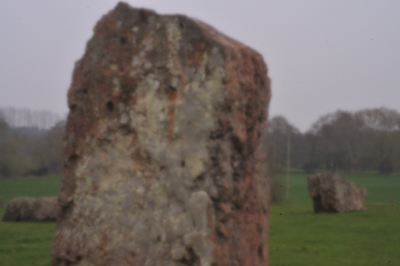
The top image, right, shows the photo as
taken with no editing.
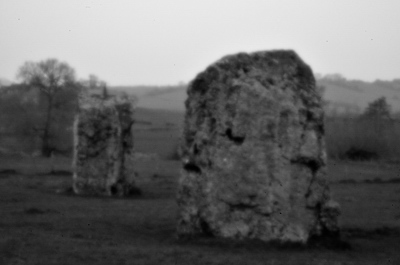
A brighter day with more light and
contrast would have made it appear sharper, so the second image has
enhanced contrast, and this time I have shown it as a black and white
image.
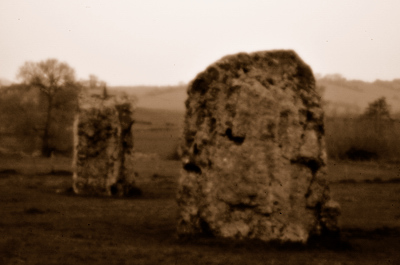
However if we want to make it look more
like an image from an antique camera, then perhaps it should be a sepia
image, and the third image is shown with a sepia filter.
Digital cameras do quite a bit of image
processing including sharpening, but without a known lens this is not
undertaken.
From this you can see, you could be amazed
that you can get reasonable photos from a camera with no lens, or
disappointed the results don't match that of a high end quality lens.
You could also see the potential to
produce some historic looking photos, or decide this makes no artistic
sense whatsoever to you.
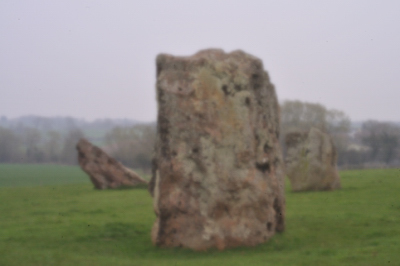
I have included two more photos in
unedited form, and the full gallery can be seen at Stanton Drew Stone Circle - Pinhole
Gallery.
At Stanton Drew there is a large circle
with a second circle within it, and nearby the remains of two further
stone circles, with another stone feature not far away. For the pinhole
gallery I just concentrated on the main circle with its second circle
within it.
You can compare this with a gallery of
the same location taken using a lens on the camera in the
Stanton Drew Stone Circle Gallery.
Further Information
Pinhole
Photography Section
Topic Index -
Pinhole
Photography
Pinhole Photography
Doorway
www.photographers-resource.co.uk/d/pinhole
Introduction to
Pinhole
Cameras
Pinhole Adaptor
Stone Circles Section
Topic Index -
Stone Circles
Stanton Drew Stone Circle, Somerset
|
 Unedited photo
with black and white
filter and enhanced contrast
as above with sepia
filter
|
|