| Home | Newsletter | Locations | Diary |
|
Indexes |
|
|
|
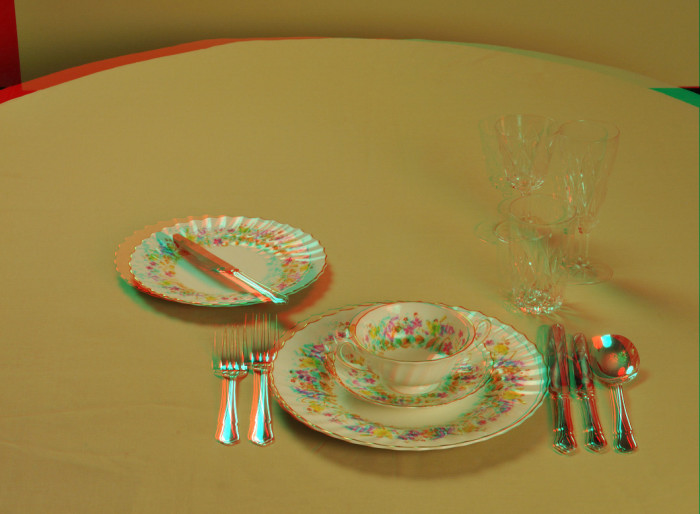
Article Taking 3D with One CameraWith the exception of some
Lenticular images
We can capture the two images, hand held with nothing beyond our camera, with a tripod and attachment, a prism arrangement to fit on the front or using two cameras. In this article we are concentrating on how to take images to produce 3D photographs using one camera. We are not here covering the prism attachments, but all of the other methods. The objective in all cases is to take two images one from the perspective of each eye. With a normal looking lens length and, as long as we are not too close, this is about the difference between our eyes. The two images are parallel, not tipped in towards each other. So the camera just moves sideways between one image and the second. The sideways distance between one photo and
the next is called the
Stereo Base
One Camera or Two We can photograph anything that is
relatively still using one camera, but for live action 3D, for example
catching a horse going over a jump or a steam train approaching us at speed,
we will need to use two linked cameras. There are often more restrictions on
what we can do when using two cameras. We have a second article looking at
Taking 3D Images with 2 Cameras. What you need 3D images can be taken using just your
camera, handheld if you want, you don't need to buy anything special, the
software is free and 3D glasses are widely available and given away with video
hire, some videos, some games, and occasionally in magazines and other ways,
you can also make your own see our project
Project -
Making 3D Anagraph or Anachrome Glasses.
If you want, you can use a sliding bar or other attachments and a tripod, and this can be both easier to use and give a near 100% success rate. Handheld Photos You can take images that will be made into a 3D picture hand held. The objective is to just take two images, with the camera pointing parallel, not in or out and just moving it sideways between the two shots, the easiest way of producing a good success rate is:-
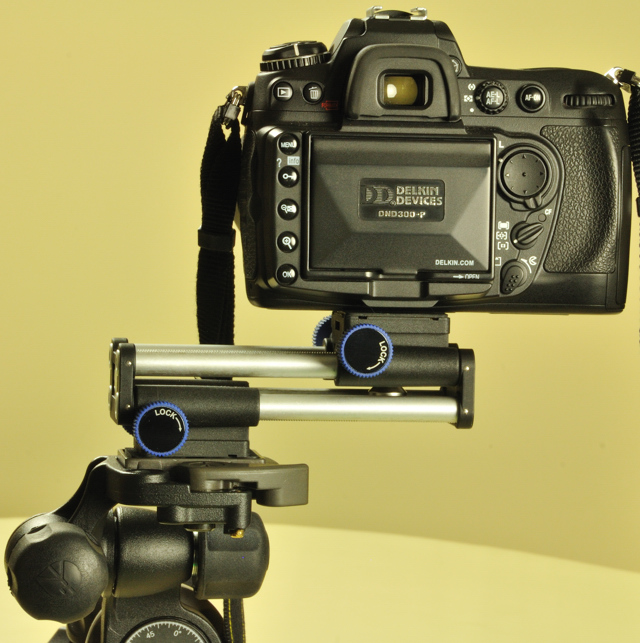
Ideally practice with this technique to get the hang of it, and gain the confidence to use it, even if you are normally planning to use a tripod and sliding arrangements or two cameras. The advantage of this method is that you can take 3D images anywhere and any when you have your camera with you. As each image is also a normal flat image, you can do this when you want as an additional option to the normal photos you are taking. With Tripod and Sliding Arrangement I prefer, when I can, to use the single
camera and sliding arrangement, its far less to carry and simpler to set up
than the two camera method and I can concentrate better on the image than
when having to concentrate on keeping the shots parallel with the hand held
method. I also have far more control over the
Stereo Base
There are a variety of sliding plates and
focusing racks that
you can get to allow a camera to be moved, most are used in macro photography.
When selecting the one for you consider the range of movement you can get
and how easy it is to use. You also need to see if there is any chance when
you loosen anything of the camera falling off. One example is shown in our article on the
Novaflex Castel-Mini,
Some tripods allow the centre bar to flip to become horizontal and in theory you could slide this with the camera looking sideways, but the odd occasions I have tried this it has not produced results that did not require a lot of Photoshop work. I think this is because however careful you release and move things, its never quite parallel. Using a device like the
Novaflex Castel-Mini,
You take the first photo, slide the camera
sideways by the required amount and take the second photo. Its a good idea
to always take left and then right, and to put a marker of some type between
shots sets, it could just be a photo of your hand. Working left to
right you can always take several at different stereo base settings if you
wish, but always start with left most and then take the images in sequence
as the
Stereo Base
It's always worth taking two or three sets, because although you may not have noticed anything having moved, it may have, for example a bird or plane in one and not the other, taking several sets cuts down the amount of editing required. Macro Photography
The stereo base is very small in macro
photography, generally the closer you get the smaller the distance you slide
the camera, down to extreme close ups where it could be a millimetre or two. If
you have something like the
Novaflex Castel-Mini
Having taken the images The same photos can be used to produce 3D images in any of the presentation methods. As new methods are likely to come about keep the separate images that make up the 3D image as well as the resulting images. The separate images are also normal flat images that you are used to and can be used generally.
You can get to most of the articles and
projects in this section from
3D photography -
An Introduction, See Also our
3D Section
|
||||||
|
||||||
| . | ||||||
|
||||||
|
|